

I can remember how much sample rate, bit depth and buffer size confused me when I was younger.
I knew most of the settings worked from trial and error. And back then that was good enough for me.
But I didn’t understand the benefits of a higher bit depth or sample rate. I didn’t understand what buffer size meant, or what I should set it to. Sometimes there would be a delay when I was monitoring, and other times there wouldn’t. And I didn’t know why.
Then I decided to sit down and really get to grips with these parameters and what they meant. That’s when I realized that it really isn’t that complex.
I’m guessing you’re here because you want to make your mixes sound professional. Well, you don’t need expensive gear or software to do that – you just need the right knowledge. We put together a brief training that covers a totally new approach to music production. Until now, everyone has been teaching production totally backward. Just click below to watch. Get industry-quality every time (steal this framework)
But if you just want to learn about DAW Setup specifically, keep reading.
Alright. Let’s keep this simple…
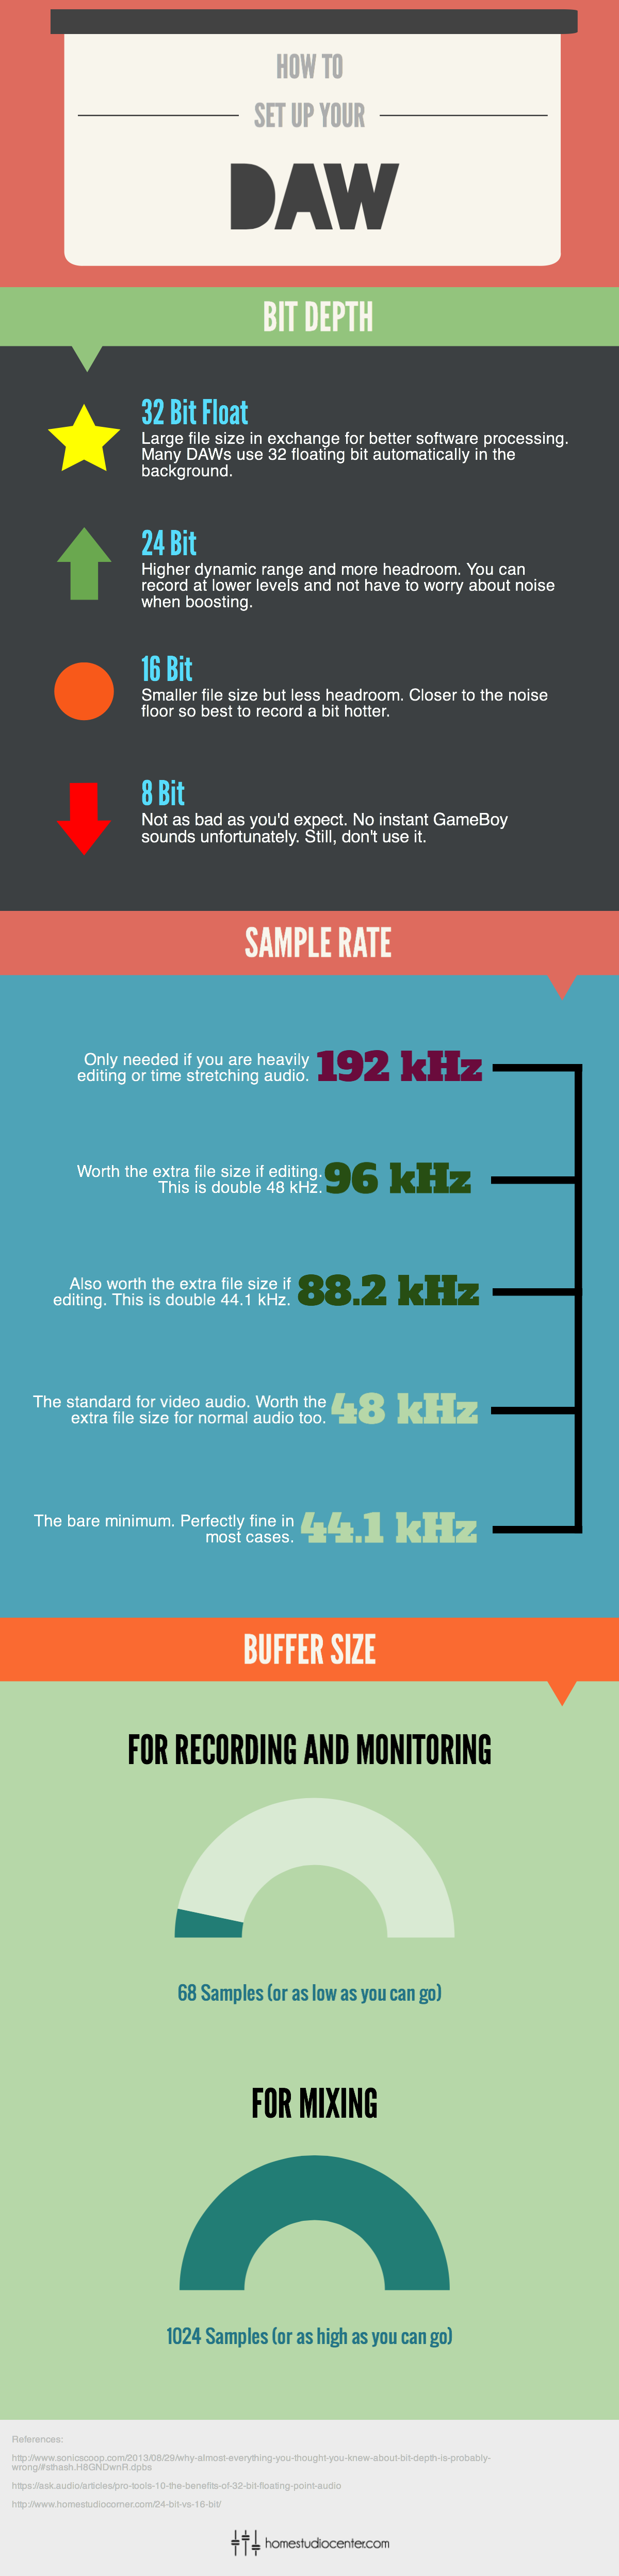
Bit Depth
Bit depth (not to be confused with bit rate) is how many ‘bits’ the computer uses to record the audio.
A higher bit depth means a larger dynamic range. A larger dynamic range means a bigger difference in volume between your recorded audio and the noise floor.
What’s the noise floor? A very small amount of noise generated by all of the electronic components of your recording gear.
To put it simply – a lower bit depth means more noise.
If you were to record at a low bit depth and turn the track up, you would hear more noise than if you recorded at a high bit depth and turned the track up.
This means that at a higher bit depth you can record at lower levels and not have to worry about noise when increasing the volume of your recording.
Still with me?
Sample Rate
Sample rate is how many times your computer takes a snapshot of the audio every second.
It’s kind of like a video. A moving image consists of lots of still photos shown very quickly in concession (frames per second).
A higher sample rate means more ‘frames’ in your audio. This is great if you want to stretch the audio out and slow it down in your DAW.
If you stretched audio with a low sample rate, you would hear the gaps between the ‘frames’.
A higher sample rate can also capture ultrasonic frequencies. Some people argue that the lack of these frequencies interferes with your audio.
Buffer Size
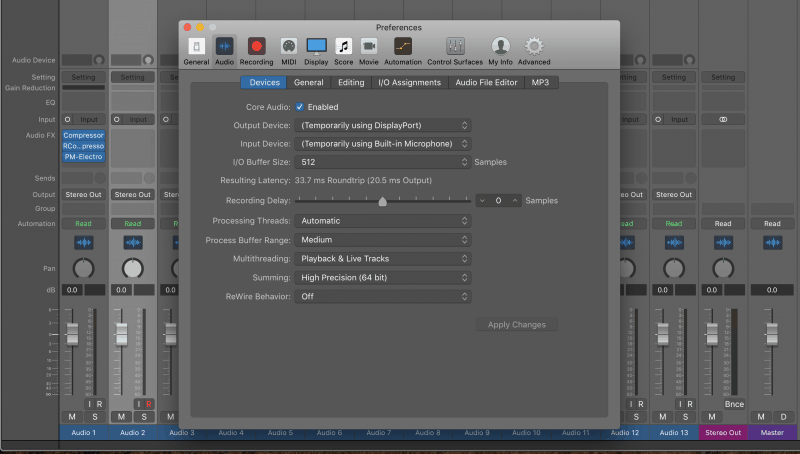
And finally – buffer size.
The buffer size is the amount of time you allocate to your DAW for processing audio.
There is no ‘good’ or ‘bad’ setting for buffer size. It doesn’t affect the quality of your audio.
It all depends on what you’re doing at the time.
When you’re recording and monitoring, you want to hear the audio back as quick as possible.
Here’s an example. You’re recording a bass guitar by plugging it straight in to your audio interface. The bass isn’t amplified, so you need to monitor it via your DAW. This way you can hear what you’re playing in the speakers or in your headphones.
Imagine if there was a delay between when you played your instrument and when you heard the audio?
How annoying would that be!
For this reason, you would want to allocate the computer a very small amount of time to process everything. So, you set the buffer size as low as it will go.
Now imagine you’re mixing. You’ve finished recording and you start loading up plugins and effects. You want the computer to have as much processing power as possible.
In this situation, you would set the buffer size as high as it will go.
Some people like to set the buffer size somewhere in the middle and forget about it. I like to adjust the buffer size depending on the situation.
File Size
A higher bit depth and sample rate can be very beneficial, but there are downsides.
By turning these settings up you’re capturing more digital information. This means your files will be a lot larger.
It’s important to find a balance between file size, sample rate and bit depth. If you can afford the space on your hard drive, record with higher settings.
In most cases, though, there is little need to go above a 48kHz sample rate at 24 bits.
Conclusion: Sample Rate
Hopefully you’ve got a better understanding of how to set up your DAW.
If you want to dig deeper into music production and learn what it actually takes to make mixes that sound pro… And you’re an intermediate or advanced producer… Be sure to check out the free masterclass: Enjoy!Next Steps
UPDATE: Learn about 7 DAW mistakes that can really hold you back in our recent video:


