


Using a De-esser is a crucial part of many mixes.
When I first started mixing, it was entirely trial-and-error. I’d spend hours ironing out the vocal mix, but I didn’t know what to do about the annoying sibilance that was wrecking the tone.
Little did I know de-essers could have solved this exact problem.
To help you avoid my tragic fate (of wasting too much time on each mix), I’ve put together this guide to de-essing. By following the instructions in this article, you’ll be able to squash sibilance in under 30 seconds.
I’m guessing you’re here because you want to make your mixes sound professional. We put together a brief training that covers a totally new approach to music production. Until now, everyone has been teaching production totally backward. Just click below to watch.Get industry-quality every time (steal this framework)
But if you just want to learn about de-essing specifically, keep reading.
How to Use a De-Esser Like A Pro
What Is A De-esser?
A de-esser is a simple tool that goes a long way in making your mixes sound professional. A de-esser allows us to compress the sibilance in our vocals.
Sibilance is a type of sound that often seems harsh in the context of a recording. Typically “S” and “T” are the worst offenders. The rest of your vocal chain could sound perfect, but words like “Specialty” may sound overwhelming because of sibilance.

A de-esser allows you to isolate the frequency range that’s causing the most sibilance. When that frequency range gets too loud, the de-esser turns it down.
It’s essentially just a fancy compressor that has a doctorate in high frequencies.
When done correctly, your listeners won’t notice that your vocals are being de-essed. But the tone and volume of the vocals will be much smoother because of it.
That being said, you’ll want to avoid getting too gung-ho when compressing, or “ducking,” sibilance. Turn it down too much and your “S’s” and “T’s” will vanish, which will sound unnatural to your listeners.
Getting Started with Your De-Esser
You don’t need an expensive plugin to get the job done. I’ll be using Logic Pro’s stock de-esser for demonstration. But pretty much any DAW will come with a de-esser that uses the same basic functions.
You’ll probably need to use a de-esser in 4 out of every 5 mixes. If you find yourself boosting the upper mids in a vocal, you’ll almost certainly want to use a de-esser.
To get started, loop a few bars of the song that has a lot of sibilance. If the end of your first verse going into the chorus has a few “S’s”, set it to loop.
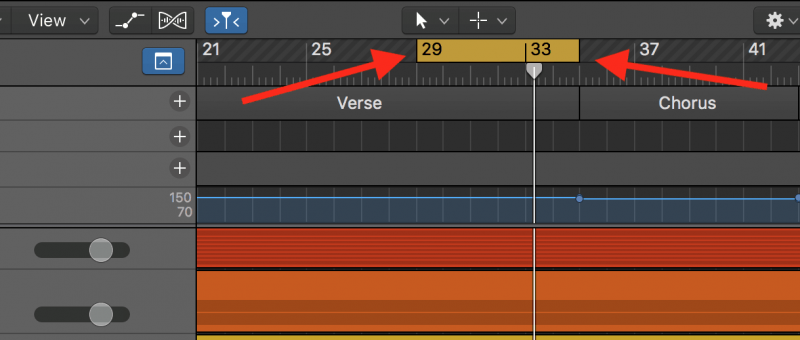
Once you’ve found the section you want to loop, load in your de-esser.
Step 1: Selecting The Right Frequency
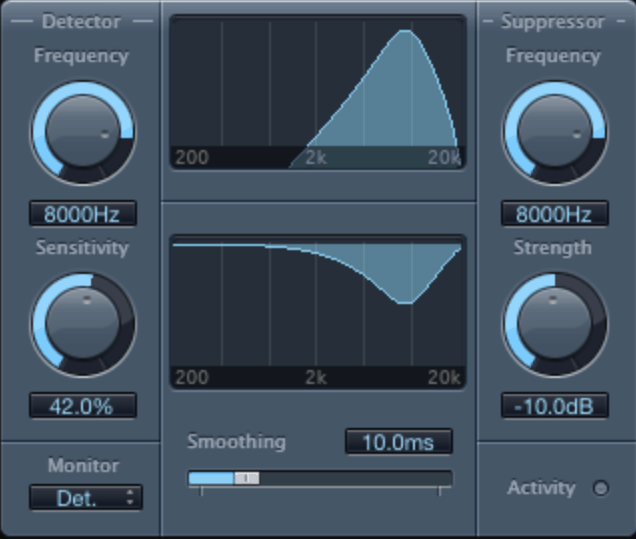
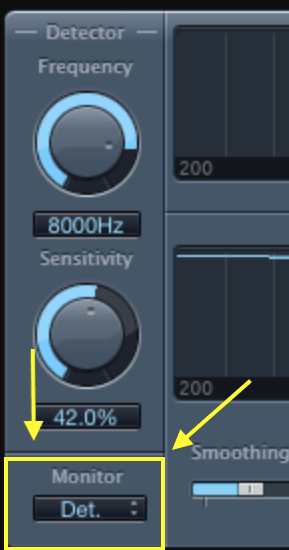
Any de-esser you come across will have a section where you select your center frequency. This is the frequency that is causing you the most trouble with sibilance. Usually it lies somewhere in the range of 5-9 kHz.
Sibilance in men’s voices is often on the lower end of this range, around 5-6kHz. With women’s voices you’ll often find sibilance around 7-8k. This isn’t always the case though, so make sure you’re listening as you pick your center frequency.
In my project, 8kHz was proving to be the worst offender.
Logic’s de-esser works a little different than most. Usually de-essers only have one section for frequency selection, but as you can see, Logic’s has two.
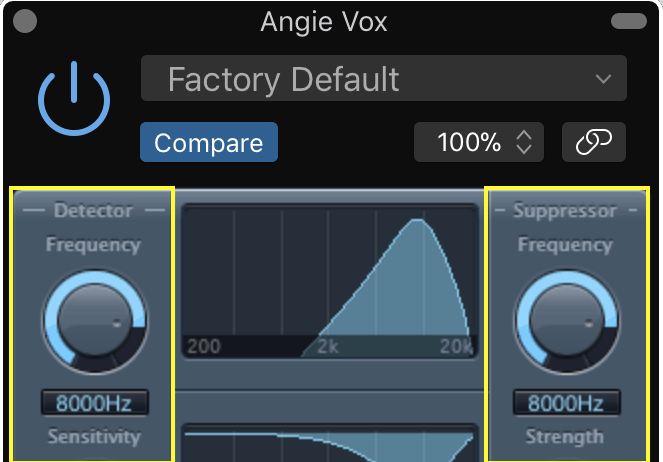
The one on the left is the detector while on the right we have the suppressor. The detector is where you choose the frequency that triggers the de-esser to engage, while the suppressor determines which frequency is actually being ducked.
As a general rule of thumb, setting the detector and suppressor to the same frequency is fine.
You want to find the frequency that makes sibilance the most noticeable and set your detector and suppressor there. Luckily, most de-essers have another tool that makes this task simple and fast.
The Monitor
The monitor allows you to solo the frequencies you’re attenuating. In Logic, you can solo the detector, suppressor, or sensitivity (more on what sensitivity is later).
 Soloing the detector allows you to listen solely to the frequency range the detector is honed in on. By doing this, you’ll have a much easier time finding the frequencies the de-esser should duck.

Perhaps 7k isn’t as biting as you expected, but as you shift the frequency range over to 8k, you find that the each “s” is almost unbearable.
Once you’ve found your problem frequency, remember to turn the monitor off again so you’re listening to the full vocal sound.
Step 2: Set the Threshold (or Sensitivity)
This is where we make sure the de-esser is only turning down the “s” and “t” sounds that are causing us trouble.
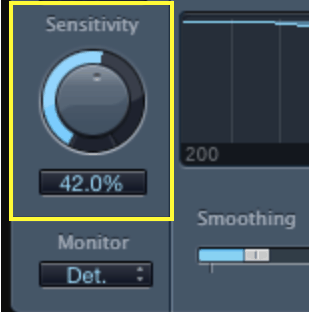
Most de-essers call this the “threshold,” but Logic calls it sensitivity. Regardless, they accomplish the same purpose. If the detector and suppressor decide where the de-esser side-chains the signals, the sensitivity decides when.
Like the threshold on a compressor, the sensitivity of a de-esser determines how loud your chosen frequency needs to be before the de-esser begins turning it down.
Turning up Logic’s sensitivity setting will make the de-esser react more. Setting the sensitivity too high will make it compress more of the signal. So you want to dial in a sweet spot between “not compressing at all” and “compressing too much.”
Fortunately, Logic’s de-esser makes it easy to see when you’re compressing the signal and when you aren’t.
Activity Light
There’s small circle on the right side of Logic’s de-esser labeled “Activity.” When the de-esser is working, this circle lights up yellow.
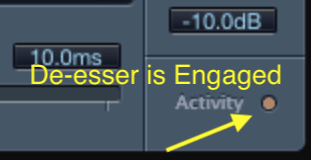
When setting your sensitivity, keep an eye on the activity circle to make sure it’s only lighting up when you want it to.
If it doesn’t light up when you need it to, you may need to turn the sensitivity up. If it’s lighting during non-sibilant words, you’ll want to turn the sensitivity down.
Step 3: Find the Right Strength
Strength is where you decide how much you want to attenuate the sibilants.
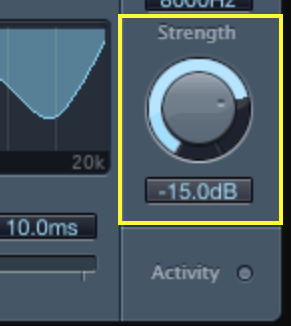
As you listen to your looped section, gradually increase the strength. At some point the sibilants will be too suppressed and the vocalist will start to sound like they have a lisp. Once you’ve found that spot, you’ll want to decrease the strength a little bit.
It’s fine to solo your vocal while finding the right frequency and sensitivity, but checking the strength is best done in context of the mix.
Step 4: Apply Smoothing
Other de-esser have functions similar to this called “attack.”
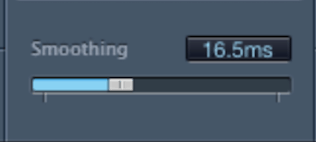
Like the attack on a compressor, smoothing on the Logic de-esser determines how fast the gain reduction is. Sliding the fader to the left will make the de-esser engage quicker, cutting off sibilance faster. By sliding it to the right, the de-esser will take longer to work.
As you might expect, you’re aiming for a good middle ground when it comes to smoothing. If it’s too fast, you won’t hear any of the “S’s” and “T’s.” Too slow and it won’t do anything at all.
The smoothing is automatically set to 10ms and I find this to be a good starting point. I usually find myself setting the smoother somewhere between 8 and 18ms.
Where In The Vocal Chain Should I Put The De-esser?
 Like many questions related mixing, there are multiple answers.
Wherever you place your de-esser, make sure you’re doing it intentionally. Any place you put it will change the sound of your vocal.
Here’s what I do…
I place my de-esser after EQ and Compression, and before any effects.
If you use EQ after de-essing, you may end up boosting the upper mids, which is likely to make sibilance a problem once more. I put my EQ first, that way I haven’t wasted time on a de-esser that may not do its job once frequencies have been boosted.
Compression raises the noise floor, turning up the quietest parts of a sounds while turning down the loudest. This means sibilance is likely to sound louder after compression.
Since the sibilance is louder, it’s easier for your de-esser to detect it. Compressing before de-essing makes it easier for your de-esser to ‘see’ problem frequencies.
I de-ess before effects processors for the same reason I use EQ before effects. Trouble frequencies can get more troublesome once effects have been applied.
For example, muddiness in the mid-range will just get worse once it’s been saturated. By cutting out problem frequencies earlier in the mix chain, you ensure that your effects sound as clean as possible.
Similarly, by turning down sibilance earlier in the chain, you ensure that any affects you add later don’t contribute to the problem.
Other Uses for a De-esser
While de-essers are most commonly used on vocals, that certainly isn’t the only application!
For example, if the string noise from an acoustic guitar is too prominent, try throwing a de-esser on it. You could also reduce bow noise from a stringed instrument with a de-esser.
By using the same techniques described above, you can find your problem frequency range and turn down the offending sounds.
Stick with your stock de-esser until there’s a good reason to upgrade. Don’t spend money if you don’t have to!
If at some point you decide to buy a premium de-esser, you may want to check out Soothe by Oeksound. It’s similar to a de-esser, but has some bonus features that help justify the upgrade.
Conclusion
When using a de-esser, follow these 4 simple steps to make sure you get it right every time.
- Find the frequency where sibilance is most present.
- Set your threshold (or sensitivity) so the de-esser is only turning on when sibilance is present.
- Turn up the de-esser’s strength until the vocalist “S’s” and “T’s” are hard to hear. Then dial the strength back a little bit.
- Set the smoothing so the gain reduction sounds natural, usually between 8 and 18 ms.
If you want to dig deeper into music production and learn what it actually takes to make mixes that sound pro… And you’re an intermediate or advanced producer… Be sure to check out the free masterclass: Enjoy!Next Steps


